
Engine connecting rod in motorcycles: what it is, how it works and how to change it
The connecting rod in a motorcycle is one of the critical elements of an internal combustion engine and one of the most heavily stressed mechanical parts. Let's find out what how does it work, why it is crucial for performance, and how to disassemble it from the crankshaft for maintenance: here you also find the instructions to change, install and balance it.
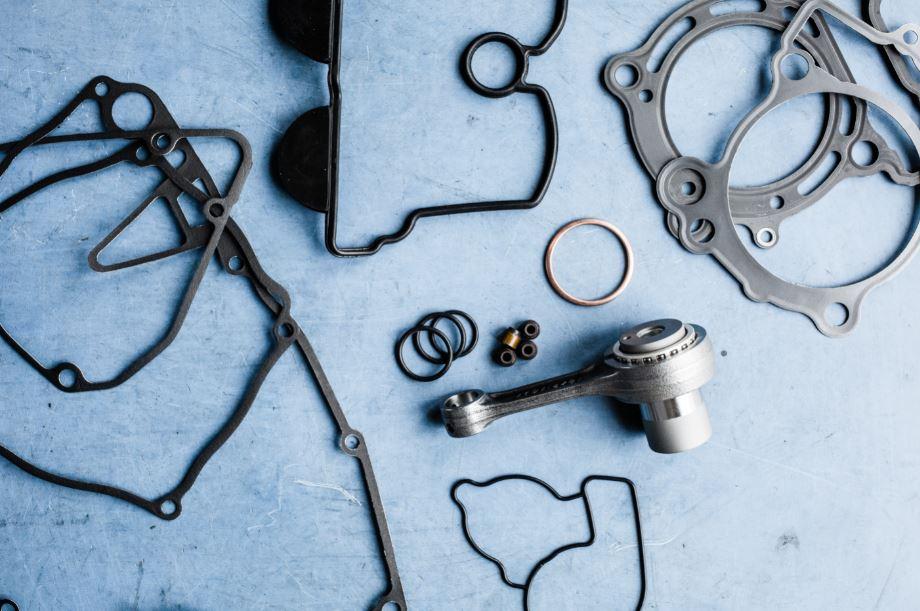
What is a motorcycle connecting rod: two-piece type and others
The connecting rod is one of the critical elements of an internal combustion engine. It is part of the connecting rod-crankshaft system, which is responsible for converting the reciprocating motion of the piston into the rotary motion of the crankshaft. Specifically, the connecting rod connects the piston, which moves in a reciprocating linear motion inside the cylinder, to the crank pin of the crankshaft, which performs the rotary motion.
The connecting rod has two ends connected by a rod (shaft): the smaller-sized end, called the foot, moves together with the piston, while the opposite end is called the head and moves with the crank pin. There are two main types of connecting rods available on the market, differentiated by the head: this component can be made with a single piece or, alternatively, with two detachable pieces. Detachable models are used on monolithic crankshafts, while monobloc models are used on composite crankshafts, as in most motorcycles. Between the connecting rod's crank pin and the crankshaft pin, there can be a bearing that acts as a bushing. Sometimes, especially in dirt bikes, a roller cage, a specific type of bearing (consisting of small rollers), is found between the foot of the connecting rod and the piston. This reduces friction and the resulting heat generation.
Engine connecting rod: what is its purpose and how does it work
We have seen that the connecting rod connects the piston and the crankshaft. The piston moves with a horizontal motion thanks to the thrust produced by the combustion in the combustion chamber. The connecting rod, on the other hand, moves with a composite motion: the foot follows the piston, while the head, at the opposite end, moves with a crank motion. As a result, the connecting rod's shaft moves in a swinging motion, taking on different inclinations during the various phases of the internal combustion engine's operation. As the piston rises, the shaft tends to straighten, while when the piston descends, it tilts, allowing the distance between the piston and the crankshaft to decrease.

Connecting rod issues: why it breaks and consequences
The connecting rod is one of the elements subject to the highest stresses in the engine. Therefore, it is possible for it to break, deform, or dislodge from its seat, leading to connecting rod failure.
Usually, the problem starts with an increase in clearance of the head bushing or the bearing and cage of the foot. This clearance immediately creates greater friction and accelerates wear.
One of the main causes of connecting rod damage is using the engine at excessively high RPM for an extended period. Another possible cause can be the loosening or breakage of the bolts fastening the crank. External factors can also come into play, such as water in the crankcase or the lack of lubricant (or even the use of low-quality grease).
But what are the signs of connecting rod failure? If the connecting rod breaks or dislodges from its seat, the motorcycle engine will start making a metallic noise proportional to the engine revs.
Replacing the engine connecting rod
In case of connecting rod failure, it is possible to purchase a replacement part, even online. Athena, within its range of motorcycle spare parts, offers high-quality connecting rods specifically designed for off-road use. Made with materials similar to the original component to ensure the same level of performance, Athena connecting rods are lightweight yet highly resistant and capable of reducing rotating and alternating masses.
Available at competitive prices, Athena connecting rod kits include a connecting rod, shims (spacers), and the roller cage, which will be inserted into the head of the connecting rod along with the piston pin, also supplied in the kit. Depending on the applications, off-road kits may also include the roller cage for the foot of the connecting rod and the shims.
Visit the Athena website and search for the connecting rods you need for your motorcycle. You will find a wide selection of reliable and high-performing products at competitive prices.
How to disassemble and reassemble the connecting rod: installation directions for motorcycles
Once you have purchased a replacement connecting rod, those of you who have sufficient skills in motorcycle maintenance may want to replace the connecting rod by yourself rather than taking it a shop for replacement.
In this case, the connecting rod must be disconnected from both the piston and the crankshaft. The procedure for disconnecting it from the piston is relatively simple, while disconnecting it from the crankshaft is a bit more complex as the crankshaft needs to be disassembled and reassembled, and specific tools that not everyone may have handy are required (specifically, a press and equipment for centering and balancing).
How to disassemble and reassemble the connecting rod on the cylinder
- Once the engine is disassembled and the piston is removed, detach the foot of the connecting rod from the piston. To perform this operation, you have to remove a small spring called a snap ring by rotating it with a pair of pliers.
- Now, you have to remove the piston pin that secures the connecting rod to the piston by "pushing" it out in the direction where the retaining spring was. The connecting rod is now free.
- To install the new connecting rod on the piston, simply perform the steps in reverse order.
How to disassemble and reassemble the connecting rod on the crankshaft
- The head of the connecting rod needs to be removed from the crankshaft by disassembling it with a press.
- Then remove the roller cage, shims, and the pin of the connecting rod's head.
- At this point, we recommend cleaning the crankshaft with a solvent.
- To reassemble everything, first the lubricated pin must be reinserted, followed by the first shim, the cage, the connecting rod around the cage, and the second shim.
- Finally, after lubricating well, reassemble the crankshaft using the press.
Technically, you have now finished replacing the connecting rod. Now, check the correct centering and balancing of the crankshaft before proceeding with reassembly.
Modificato il 16 February 2026
Ask the expert
-
 Ask the expertAuto
 -
 Ask the expertMoto
 -
 Ask the expertMoto